
Introduction
Push notifications have become an immortal part of the mobile experience. However, email has also this quality of sending notifications to promote your business, but that is not sufficient to engage a user to revisit your app.
Today, every person has a busy schedule. However, when they see a big notification on their device, they will be irritated, and they might not even read the content, which may be related to their interest.
Now you must be in a dilemma: how can you engage a visitor to convert him to a subscriber?
Don’t worry! We will help you through this article.
The solution is iOS Push notifications!
Yes, it is the fastest and easiest way to engage more and more customers on your website. These are short, engaging pop-up messages that a user cannot resist.
Now, every mobile operating system has a push notification feature, every e-commerce marketer can enjoy the benefits of push notifications.
iOS push notifications have made it easier to engage customers, retarget customers, and increase sales. The marketer needs to send a message about the user’s taste or interest to the customer, and the results appear.
In this article, we will be defining iOS push notifications and the steps you need to take to enable push notifications on iOS devices. However, we recommend that you follow these steps because they can be extremely beneficial.
What are iOS Push Notifications?
So, these are small pop-up messages that appear on Apple devices. However, before receiving notifications, the user needs to grant permission. Once the user clicks on “allow,” they can receive notifications on their devices.
Once a user grants access to push notifications, mobile app publishers can send push notifications to the users’ mobile devices. Additionally, iOS users don’t have to be active on their devices at that moment to receive notifications.
But Remember Unlike Other Push Notifications It Has Word Limit Too!
iOS devices have guidelines that can trim notifications so that they can be arranged in each notification style. For both the iOS Notification Center and lock screen, the count limit of iOS push notifications provides space for roughly 4 lines of text.
As a general rule, we suggest trying to get the most essential, actionable part of your message across in the first 40 characters. It ensures that it is displayed optimally across multiple devices and operating systems without truncating important information.
These guidelines are a perfect reference for arranging your messages. But you should always try to test with various device sizes and iOS updates, it’s necessary to test to make sure your content will fit the devices you’re aiming at.
How Does It Work?
You can generate notifications using the push notification provider WonderPush. It is the easiest and cheapest provider for making push notifications.
Structure Involved In Sending An iOS Push Notification

- Provider: It is a server that you deploy, manage, and configure to work with APNs.
- APNs: It is a cloud service that allows approved third-party apps installed on Apple devices to send push notifications from a remote server to users over a secure connection.
- Client device: This is the targeted device, i.e., an iPhone or any Apple device.
- Client app: the author’s mobile app.
Once you are finished setting up push notifications on your providers and in your applications, your providers can send notification requests to APNs. The APNs then deliver the notification to each targeted device. Once APNs receive a notification, the system forwards the notification to the particular app on the device.
If a notification arrives while the device is running but the app is not, the system can still display the notification. Additionally, if the device is powered off when a notification is sent, APNs will hold onto the notification and retry when the device is powered on again.
Steps To Enable Push Notification On iOS Devices
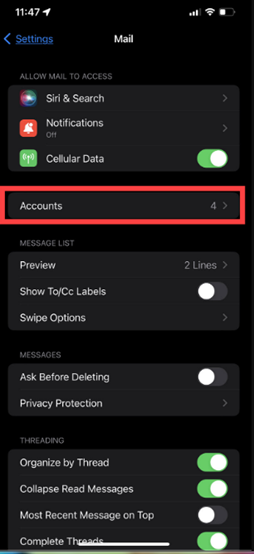
- From your home screen, select the Settings icon.

- Scroll to find and tap on “Mail.”

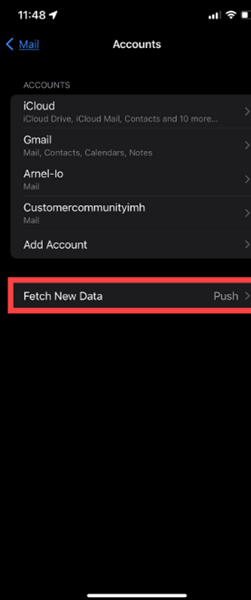
- Tap on Accounts.
- Under your list of accounts, you will need to click on “Fetch New Data.”
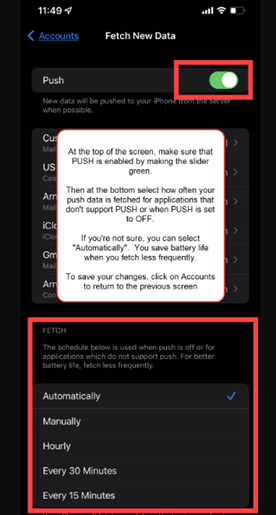
- Find the button next to “Push.” The button will display green when this option is enabled. If the button is not green, tap it to enable it. After you have enabled push (or turned it off), make sure that your FETCH settings are selected at the bottom of the screen.
As per the note that Apple provides, the schedule for FETCH is only used when Push is turned off or for applications that do not support Push. You can improve your battery life by fetching less frequently.
Conclusion
So, these were the steps to enable iOS Push Notifications on Apple devices. However, if you are looking for a provider that is easy to use and cheap as well, then always choose WonderPush.
